 |
|
|||||||
| Map Making Discuss everything related to creating new levels here. |
 |
|
|
Thread Tools | Display Modes |
|
#1
|
|||
|
|||
|
OPENING THE EDITOR
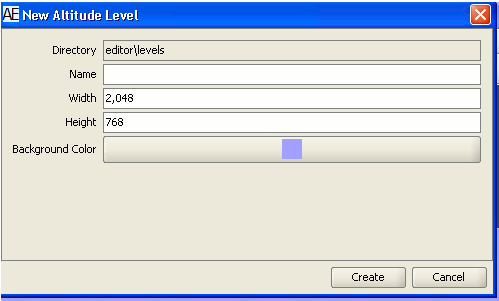
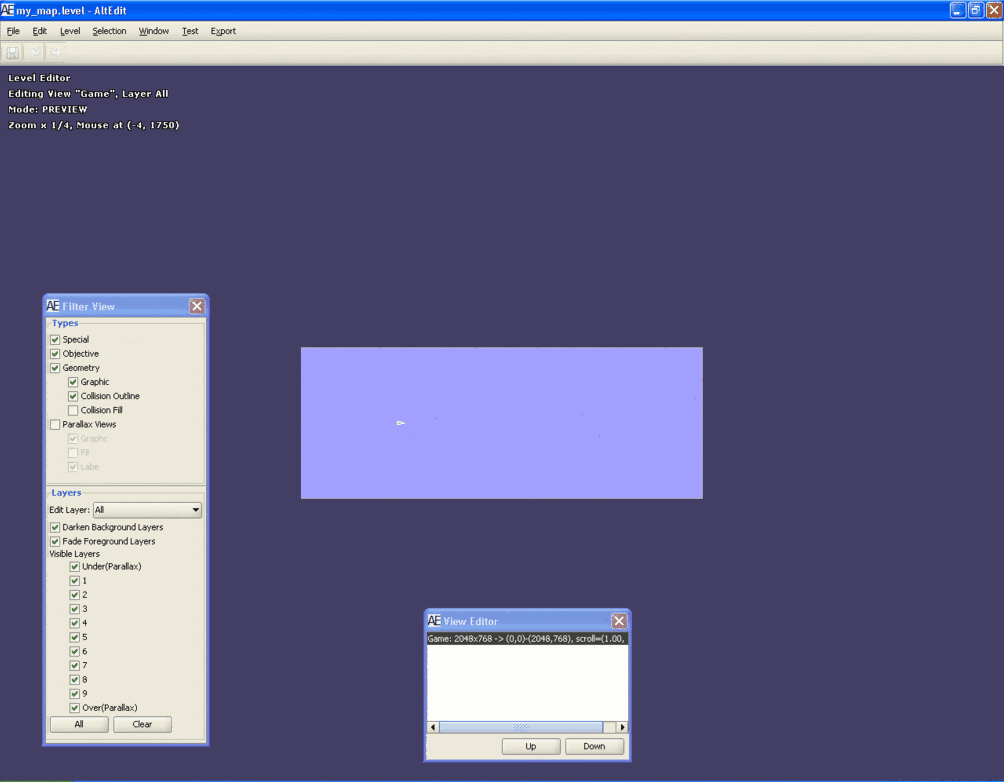
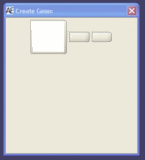
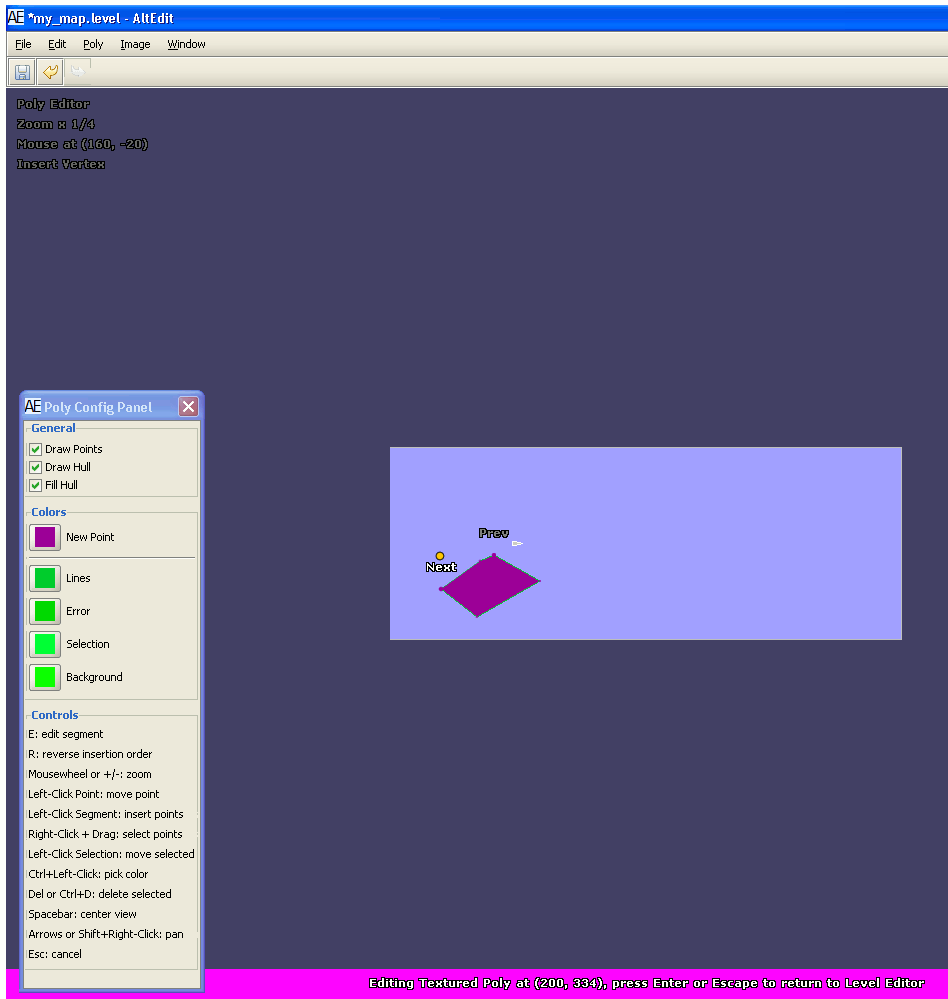
The Altitude Map Editor is located in the folder in which Altitude was installed (the default on PCs is C:\Program Files\Altitude) . To launch the editor find the file called altitude_editor.exe and double click it. STARTING A NEW MAP Create a new map by clicking File->New->Map In the "New Altitude Map" box that appears enter the maps name, the map size, and select the maps default background color. For comparison purposes, the size of tbd_cave is width: 3584, height: 1280. When you're finished click "Create."  Note: don’t worry if you don’t get these settings exactly right the first time, you can change them later. Background color can be changed with Map->Change Background Color and map size and name can be changed by right clicking the “Game” view in the View Editor box and then selecting “Configure Game” You should now see something like this:  Note: you can control whether the Filter View and View Editor boxes are visible under “Window” The rectangle in the middle of the screen is your new map, and the starting position of the silver team’s planes is the silver triangle. You can zoom in or out by using the scroll wheel on your mouse. The zoom is centered on wherever your mouse cursor is, but if you lose sight of your map, don’t panic. Just go to the “View Editor” box (in the bottom middle of the previous screenshot) and click the “Game: 1234x987 -> (0,0)-(2048,768)” view. Your map should reappear in the center of the screen. ADDING POLYGONS TO YOUR MAP To add terrain to your map click “Window” at the top of the screen and then click “Show Create Geom”. A "Create Geom" box should appear in your editor that looks like this:  Click the White square in the Create Geom box and you should notice that the “Mode” (in the top left corner of the editor window) changes from “PREVIEW” to “CREATE_GEOM_USING_SELECTED_TEXTURE.” The White square you clicked earlier is your selected texture (i.e. no texture). Now left click on the region of your map where you want to draw a new polygon. A little yellow dot should appear where you clicked on the map indicating where you clicked. The pink bar at the bottom and the “Poly Editor” text in the top left inform you that you have now entered the Polygon Editor. You’ll also notice the “Poly Config Panel” has appeared. Under the “Colors” heading in the “Poly Config Panel” click the colored box next to “New Point” and select the color of the polygon you wish to draw (ignore the other color boxes, they are there to trick you). Now left click on the map where you want to start the border of your polygon. By repeatedly left clicking you can create a series of points that represent the border of the polygon you wish to create.  When you’re done laying out the border points of your polygon just do a Right Click. You’ve now created a little object on your map. If you’re not happy with it however, you can easily modify or delete it. Here’s how: • To move a single border point, left click it, drag it to a new location, and release. • To add a new point to a line segment, left click a line segment and a new point is created. • To select multiple points, hold right click and draw a square over the points you’d like to select. You can move or delete all of these points at once. • To delete a point, select it and then press the delete key. • To change the color of your polygon go to Poly->Change Point Color When you’re finished with your polygon, press Enter or Escape to exit the Poly Editor and return to the Map Editor. Note: even if you want to create another polygon, you still have to exit and restart the Poly Editor for each polygon Back in the Map Editor, you can now adjust the properties of your newly created polygon. First, select the polygon or polygons (hold shift to select multiple polygons), then right click your selection. An “Edit Luon” box like the following should appear: http://s226.photobucket.com/albums/d...rrent=Luon.gif “Collidable” determines whether Players collide with the polygon or not “Damage Modifier” determines how much damage a plane takes when it collides with the polygon. A value of 1 is normal. “Elasticity” determines how much of a planes speed is bounced back off the polygon when a collision occurs. “Layer” determines which polygon is displayed when two polygons overlap. The polygon with the higher layer value is displayed on top. “Visible” determines whether the polygon is visible. “Edit Hull” takes you back to the Poly Editor where you can make further changes to the shape and color of your polygon. ADDING SPECIAL OBJECTS When creating an Altitude map it’s important to have more than just polygons. To add things like powerups, bases, turrets, and spawn points first make sure you’re in Map Editor mode (as opposed to Poly Editor mode). Then select “Window” on the toolbar and click “Show Create Special”. The “Create Special” box looks like this: http://s226.photobucket.com/albums/d...nt=Special.gif Select the object you wish to add and then place it on the map with a left click. As with polygons, Special Objects can be edited and configured with a right click. TESTING YOUR MAP To test your map first make sure you’re in the “Map Editor” mode, then select “Test” on the top toolbar and click “Run”. To end the test hit the escape key on your keyboard and you will be returned to the Map Editor. Hope this was helpful. In the future I will discuss more advanced features of the map editor, but for now you can get that information from Lamster's posts at: http://vapor.nimblygames.com/forums/showthread.php?t=16 Last edited by Pieface; 02-24-2010 at 01:31 AM. Reason: removed non-functional link at beginning |
|
#2
|
|||
|
|||
|
im using a mac and i have experiencead a couple of problems with the editor. The first is when i try to right click my polygons which is ctrl+click on mac to bring up the "edit luon box," it doesnt open. The second is the testing which only shows the bots flying around and wont let me join the session.
|
|
#3
|
|||
|
|||
|
and thank you for this guide it makes everything easier
|
|
#4
|
|||
|
|||
|
I have a transparent PNG which I intend to be an obstacle located in the 'images' folder of the map I'm editing. There seems to be two ways to place it: using the 'Create Geom' window, or the "place sprites" menu option. Is there a difference?
|
|
#5
|
|||
|
|||
|
No difference -- place sprite is just a convenience method with a different UI.
|
|
#6
|
|||
|
|||
|
My select multiple isn't working. Any explanations?
|
|
#7
|
|||
|
|||
|
Select multiple objects in the level editor, or multiple points in a poly?
What OS are you using? |
|
#8
|
|||
|
|||
|
Either single or multiple.
It's a Windows Inspiration E1505. As for the OS I have no clue. |
|
#9
|
|||
|
|||
|
Oops didn't notice that last link...
Last edited by Anybody; 02-22-2009 at 03:20 AM. |
|
#10
|
|||
|
|||
|
Sorry about that, I didn't see the "press enter or escape"
Sorry to bother you. |
|
#11
|
|||
|
|||
|
Quote:
Hope this helps! |
|
#12
|
|||
|
|||
|
sorry for being a noob but how the hell do you add textures to objects or backgrounds to the sprite list. i looked at maps like cave and can't figure out how to get textures in the box like that.
|
|
#13
|
|||
|
|||
|
all official maps had there images placed w/ Ctrl-e (place sprite).
then ctrl+g to create geometry that you collide w/. |
|
#14
|
|||
|
|||
|
ya but i mean how do i get the textures in the first place. my ctrl-e is empty how do i get textures in there
|
|
#15
|
|||
|
|||
|
If you are going to place sprites then place them in the "images" folder in your insides altitude/editor/maps/your_map folder. If you are going to make polygons inside the editor and then assign a texture then place the texture inside the "textures" folder. After you have put them in those folders then go to the Edit menu and choose "Refresh Resources." You should then be able to see those images by using either "Place Sprite" or by using the "Show Create Geom" tool.
|
|
#16
|
|||
|
|||
|
put up a quick and dirty guide on how tbd_hills was created.
Hopefully we'll get a wiki up and running soon with much a much better editor manual. http://altitudegame.com/map_editor.html |
|
#17
|
|||
|
|||
|
Quote:
|
|
#18
|
|||
|
|||
|
Am I missing something when placing a background? Obviously if I put it as a bottom layer on the Game set, the ships are all hidden behind it. But if I make a new view below Game and put it there, it works, but doesn't show up for people who have their texture settings set to Low in video options.
I'm using a 1600x1200 png unscaled on a 4:3 map, should I use a different image type or configure something other than the default? |
|
#19
|
|||
|
|||
|
Low texture detail suppresses rendering of all non-Game layers. This is necessary for certain laptops with poor integrated graphics, as they are typically severely fill limited. Instead, low graphics users will see only the level's solid-fill background color -- so choose the color that best replaces your desired background image when needed.
|
|
#20
|
|||
|
|||
|
Quote:
|
|
#21
|
|||
|
|||
|
Quote:
|
|
#22
|
|||
|
|||
|
how do u add a picture and use it as ur backround? when i try it, i have to go into create polygon/sprite. i also try to put the spawn points on top of the backround, but for some reason, they end up underneath it.
|
|
#23
|
|||
|
|||
|
I don't have a decent graphics program on my computer, so I can't create my own unique hulls. My question is, how can I steal hulls from other maps? I know I can just open a downloaded map, re-arrange crap, and save as something else. But, is there a way I can just start a new map, then export PNGs from maps I have downloaded into my new map? THe only way I can think of is by opening the downloaded map. Printing screeen. Cropping individual parts. Saving in new folders map. THe add. But, this takes forever.
|
|
#24
|
|||
|
|||
|
when you open a map you'll get:
C:\Program Files\Altitude\editor\maps\__imported_map\images and C:\Program Files\Altitude\editor\maps\__imported_map\textures the raw png's are in there |
|
#25
|
|||
|
|||
|
I found how to get to those, but how do I take them from their and put them into the image folders for different maps. I can't click/drag them, and whenever I try to open them, it says that the wrong type of editor is open. I"ve also tried reaching those through import under file, but then those png's don't even show up.
Last edited by as red as black; 06-16-2009 at 06:37 AM. |
|
#26
|
|||
|
|||
|
Quote:
Open an existing map in the editor and then do a "save as" so that you will now have a new folder inside your editor folder that is the name that you just saved it as. (for example open lost city and then do a "save as" and name it testing123 and you will have a folder named testing123) Now create a new map in the editor that will be your new map. Also save this map using the "save as" function. Now you will have two folders inside your editor, one is your map and one is a copy of lost city (or whatever map you decided to save). Now go to the folder of the saved lost city map. Inside that folder is a folder named "images" and inside that folder is all the images used in that map. Drag and drop all those images into the "images" folder for your own map. Now go to the "edit" menu in the editor and select "refresh resources." You should now be able to place any of those images using either the Place Sprite option or the Create Geom option. Hope this helps! |
|
#27
|
|||
|
|||
|
I think I have found the files youre after.
The total size is 18.2 Mb which is a bit much to e-mail, but maybe the file names will help if administration are looking for them: demoobjects demotubes deomtextures sic I have them in the same folder as the first version of Subfkes map making guide. I dont know whether that means they were bundled, or I just put them together. |
|
#28
|
|||
|
|||
|
Quote:
Maimer, you are GOD |
|
#29
|
|||
|
|||
|
I placed a Red and a Blue spawn point and cannot see them though they are on Level 7... on top of everything else, right? I can hear them and they crash into collidable objects... why are they invisible???

|
|
#30
|
|||
|
|||
|
You are most likely placing an image (probably a background image) on the Game layer. Anything and everything you place on the Game Layer will render on top of where the planes fly. That means if you place an object in the Game Layer and then make it non-collidable, the planes will fly underneath. (Think of the clouds on the top of tbd_hills). Assuming you placed an image designed to be a background image on the Game Layer, you will need to change that. I assume you placed the image on the Game Layer and assigned it something like Layer 1 and then put the spawn points on Layer 7. This will not work! The layers only apply to objects placed in layers and are not related to where the planes fly. Right click on the "Layers" menu and click "Create New Layer." Name it background or whatever you want and make sure that it is ABOVE the Game layer on the list. It might seem counter intuitive, but the Layers first (top) on the list are the ones that render first. Then put your background image, or any image you want the planes to be able to fly over on that layer. Now it should work!
|
|
#31
|
|||
|
|||
|
The clouds part. Light streams forth. THANKS!!!

|
|
#32
|
|||
|
|||
|
how do u use animated poly under file/new/animated poly?
|
|
#33
|
|||
|
|||
|
You don't. It's used by us internally. There is currently no way to have animations in a map.
|
|
#34
|
|||
|
|||
|
Quote:
 awwwwwww... awwwwwww...
|
|
#35
|
|||
|
|||
|
What is an animated poly?
|
|
#36
|
|||
|
|||
|
Animated polys are sort of like the TODO challenges, its a feature they wanted to add but haven't gotten around to.
|
|
#37
|
|||
|
|||
|
Quote:
Some of my current map ideas include: - Stadium with a huge crowd and camera flashes, as well as an animated big screen TV in the middle with advertisement on it. - Blimps and balloons in the background floating up and down.. - Water that moves.. - Ships that moves with the waves. - Propellers on a floating air fortress. - Search lights that go back and forth in the background. The list could go on, I'd love to see this because it would bring so much more life to the maps. |
|
#38
|
|||
|
|||
|
this is a really nooby question, but how do I delete objects after ive made them. Just selecting them and hitting backspace does nothing.
|
|
#39
|
|||
|
|||
|
You might have to use the "delete" button, I haven't made a map in a while, but last time I think that worked. It's kinda annoying cuz I always just use backspace, but you have to get used to it D:
|
|
#40
|
|||
|
|||
|
if it was just a matter of hitting a delete button, that wouldnt be to bad, but I couldnt even find a delete button. I literally could find no way to get rid of an object
|
 |
|
|